Add SkyyDesk to your application, step by step
In this guide we add SkyyDesk to an empty .NET application and then connect to it from another computer. Each step has the command to type and what you should see on screen. Every screenshot comes from the real run we did while writing this guide.
First, see how it works
- Your applicationContains the SkyyDesk library. Gets an ID for the machine and asks you about incoming requests.
- SkyyDesk serversBring the two sides together and carry the picture. Accounts, address books and licences live here.
- The person connectingConnects from skyydesk.com in a browser or from the SkyyDesk app, with their own account.
- Your application starts.The library connects to the server and gets a 9-digit ID for the machine. If you gave an enrollment key, the machine is also written into your address book.
- Someone wants to connect.They type the ID on skyydesk.com or click the machine in the panel's address book.
- Your application decides.The request reaches your application as an event. Nobody gets in until you accept.
- The screen streams.The person connecting sees this machine's screen; their mouse and keyboard work here.
There is no sign-in in the library. The person connecting signs in with their own SkyyDesk account and licence; your application only opens the door or keeps it shut.
Before you start
- A SkyyDesk account that can sign in to the panel. You will create the enrollment key there.
- .NET 8 or .NET 10 SDK. To check, type
dotnet --versionin a terminal. - Windows 10/11 64-bit or Linux 64-bit (X11). The system packages Linux needs are below, under Common problems.
- Outbound access: TCP 21115–21117 and UDP 21116 to
rs.skyydesk.com, 443 toskyydesk.com. - A second computer to test the connection from.
Step by step
-
Create an enrollment key in the panel
On skyydesk.com click Sign in and sign in with your account. Open Settings from the menu on the left and scroll down to the Enrollment keys card. Give the key a name you will recognise, for example "Store tills", and press Create key.
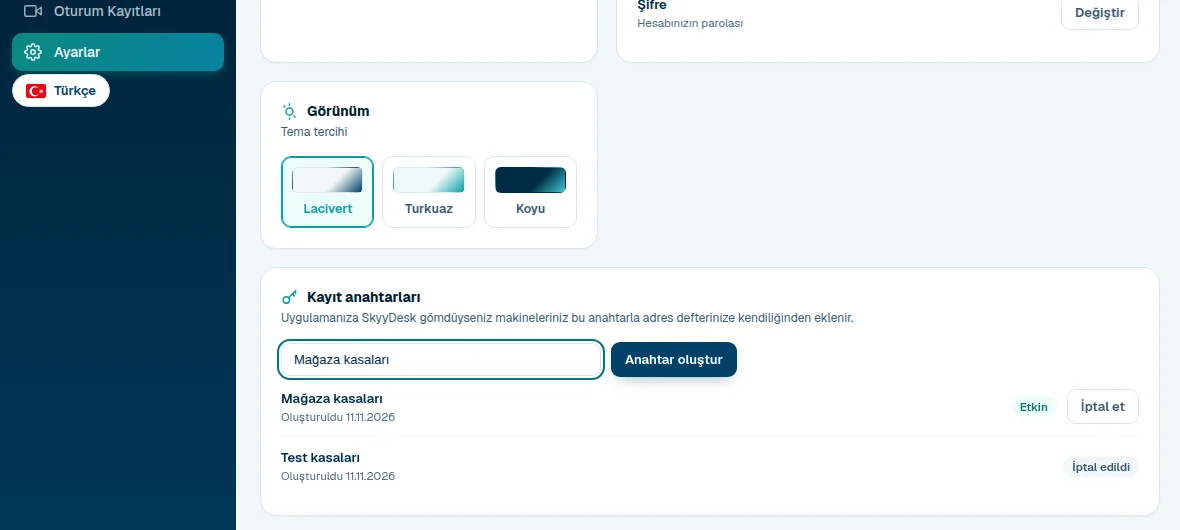
Panel, Settings, Enrollment keys at the bottom. The key is shown only once, right now. Press Copy and save it somewhere. If you lose it, create a new one.
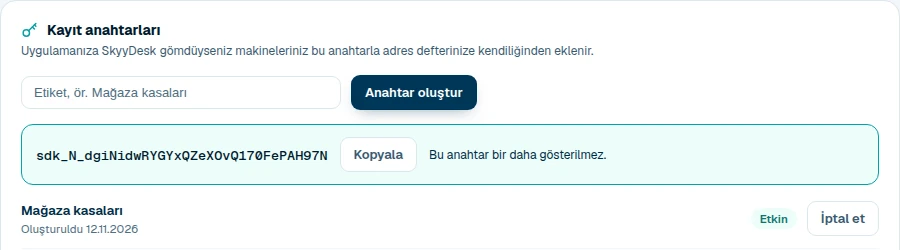
What you should see: a key starting with sdk_ and a row marked "Active" in the list. This step is optional. Without a key everything still works; the machine just does not appear in your address book by itself, and you connect by typing its ID.
-
Download the NuGet package
Download the .NET package from the developer page. It is not on nuget.org. Create a folder named
paketlerin your working folder and put the file in it:calisma/ ├── paketler/ │ └── SkyyDesk.1.4.10.nupkg └── Uygulamam/ ← created in step 3 -
Add the package to your application
Open a terminal (PowerShell on Windows, or the Terminal window in Visual Studio), go to the working folder and type these three commands. If you already have a project, run only the last one, in your project's folder.
dotnet new console -o Uygulamam
cd Uygulamam
dotnet add package SkyyDesk --source ../paketler
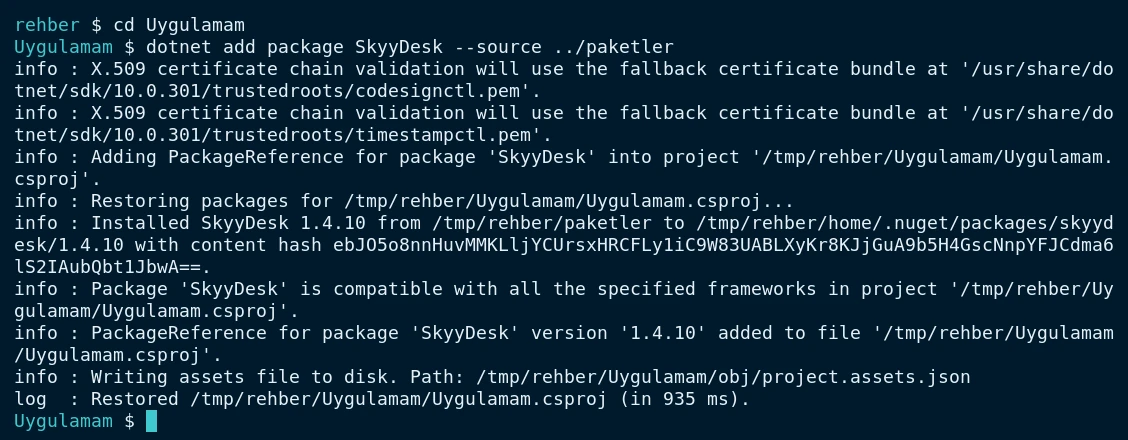
What you should see: "PackageReference for package 'SkyyDesk' version '1.4.10' added" and "Restored" at the bottom. The X.509 lines on Linux are .NET's own notice. The package copies the library into the build output itself: skyydesk.dll and the DLLs next to it on Windows, libskyydesk.so on Linux. You do not copy anything by hand.
-
Write Program.cs
Delete what is in Program.cs and paste this. It is the same file as examples/dotnet/Program.cs in the package.
using SkyyDesk;

var desk = new SkyyDeskHost(Path.Combine(AppContext.BaseDirectory, "skyydesk-data"));
desk.Incoming += (_, c) =>
{
    if (c.Authorized) return;
    Console.Write($"{c.Name} ({c.PeerId}) wants to connect. Allow? [y/N] ");
    if (Console.ReadKey().KeyChar is 'y' or 'Y') desk.Accept(c.Id); else desk.Close(c.Id);
    Console.WriteLine();
};
desk.Closed += (_, id) => Console.WriteLine($"connection {id} closed");
desk.Enrolled += (_, r) => Console.WriteLine(r.Ok ? "added to the address book" : $"enroll failed: {r.Error}");

if (args.Length > 0) desk.SetEnrollKey(args[0]);
desk.Start(allowPassword: true);
Console.WriteLine($"SkyyDesk ID {desk.MyId}, one-time password {desk.OneTimePassword}");
Thread.Sleep(Timeout.Infinite);
What each line does:
new SkyyDeskHost(...)- Starts the library. It must come first, before anything else: the library starts copies of your application for its own helper work, and those copies end on this line.
Incoming- Runs when someone wants to connect. If
Authorizedis false the person is waiting for approval:Accept(c.Id)lets them in,Close(c.Id)turns them away. Closed- Runs when a connection ends.
Enrolled- Tells you the result of the enrollment key: the machine was added to the address book, or why it was not.
SetEnrollKey- Passes the key from step 1. The key is stored on the machine; you do not need to pass it again on later starts.
Start- Makes the machine reachable. With
allowPassword: trueanyone who knows the one-time password gets in without approval. If everyone should need approval, writefalse. MyId- The machine's ID. Show this to the person who will connect.
-
Run the application
Run it with your key at the end of the command:
dotnet run -- sdk_anahtariniz

What you should see: a 9-digit ID on the "SkyyDesk ID" line and "added to the address book" below it. The machine can be reached for as long as the application stays open.
-
Connect from another computer
On the second computer open skyydesk.com. Type the ID into the Connect now box and press Connect. The session opens in a new tab and waits for approval.
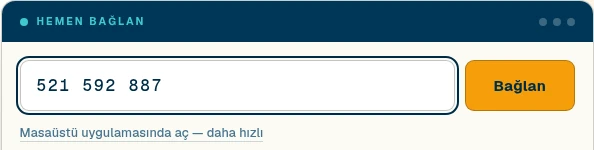
skyydesk.com home page, Connect now. 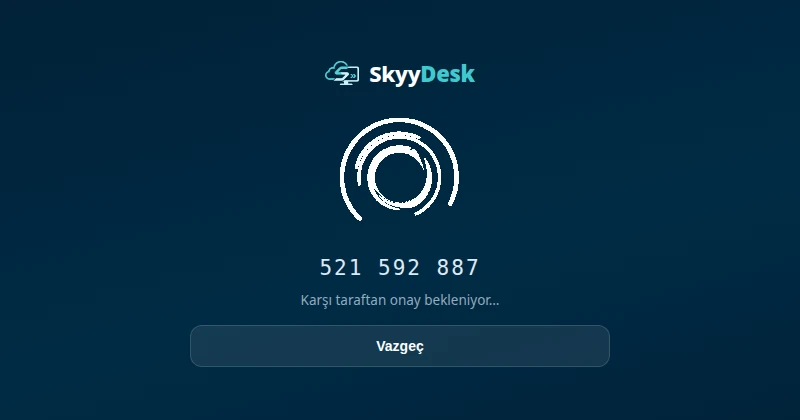
What you should see: the ID and, below it, a message that it is waiting for the other side's approval. -
Approve in the application
At the same moment the Incoming event runs in your application. The example asks in the terminal who wants to connect. Press y.

What you should see: "wants to connect. Allow? [y/N]". The account name of the person connecting is at the start of the line; we blurred it in the picture. -
The screen arrives
A few seconds after approval the person connecting sees this machine's screen and uses it with mouse and keyboard. Below is the screen of the machine where the application runs: the "y" in the terminal came from this screen too.
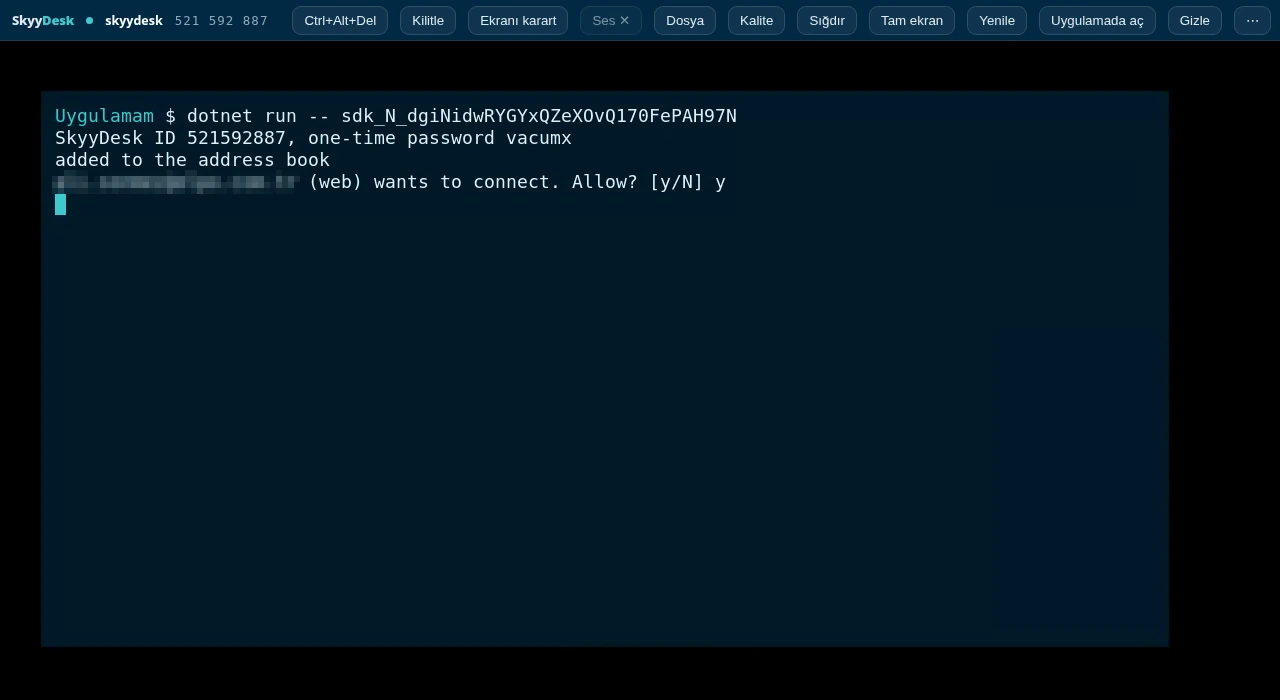
What you should see: a toolbar at the top and the other machine's live screen below it. When the session is closed, the Closed event runs and the terminal prints "connection ... closed".
-
Find the machine in your address book
Open the Address book in the panel. The machine you gave the enrollment key to is listed under Ungrouped with its name and ID, marked Online while it is running. Next time you connect from here without typing the ID, and you can move the machine into a group.
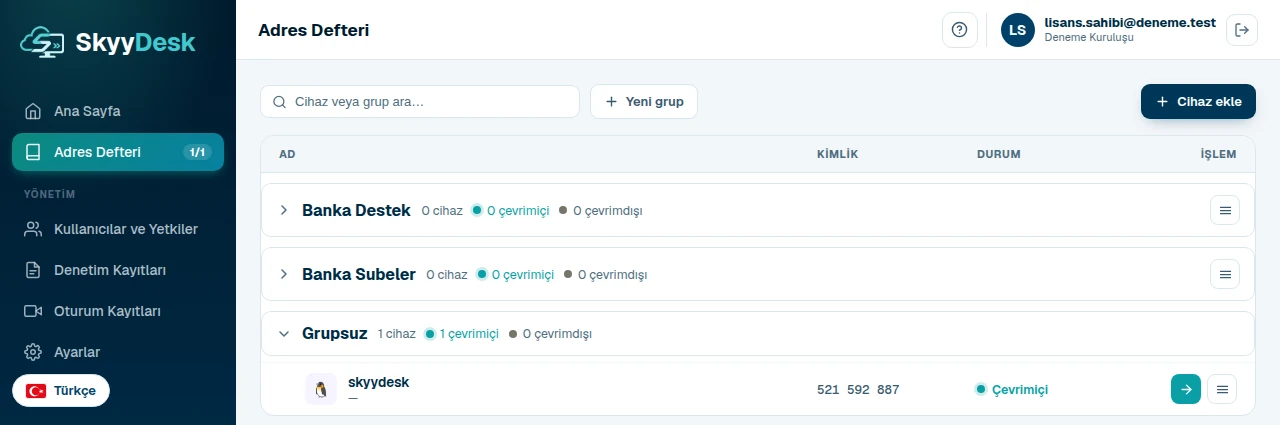
What you should see: the machine's name, its ID and Online.
Moving it into your own application
- Ask the approval question in your own window. Events arrive on a library thread: switch to the UI thread with
Invokein WinForms orDispatcher.Invokein WPF before opening a window. - The ID is kept in the machine's settings folder:
%APPDATA%\SkyyDeskHost\configon Windows,~/.config/skyydeskhoston Linux. As long as that folder is not deleted, the ID and the machine's place in address books stay the same. - Keyboard, clipboard, file transfer and audio can each be turned off, for example
desk.SetOption("enable-file-transfer", "N"). - A permanent password is set with
SetPassword. It allows entry without approval; use it only on machines nobody sits at. Details in the README in the package. - If you revoke the key in the panel, the application gets an error event on every start. If you will not use a key, clear it with
desk.SetEnrollKey("").
In other languages
C, Java and Delphi call the same C functions. Open the Windows zip or the Linux tar.gz; the examples are in the examples folder.

| Language | How to build | Example |
|---|---|---|
| C | Windows: cl host.c skyydesk.libLinux: cc host.c -o host -L. -lskyydesk -Wl,-rpath,'$ORIGIN' | examples/c/host.c |
| Java | With JNA 5.x; no JNI code to build. Put the library next to the application. | examples/java/SkyyDeskHost.java |
| Delphi | Add the SkyyDesk.pas unit to the project. | examples/delphi/Host.dpr |
The C example behaves like the .NET one: it prints the ID and asks "allow connection N? [y/N]" when a request comes in.
Common problems
| What you see | Why | What to do |
|---|---|---|
| On Windows the connection opens but no screen arrives | No Windows session is signed in on the machine, or a Remote Desktop (RDP) window was closed and left the session disconnected. Windows gives no screen in that state. | Keep a user session signed in on the machine. |
| The enrollment event says the key is invalid or revoked | The key was revoked in the panel or copied incompletely. | Create a new key in the panel and pass it. If you will not use a key, clear it with SetEnrollKey(""). |
| In C, skyydesk_start returns -2 | No event callback was given. A connection nobody sees is not allowed. | Call skyydesk_set_event_callback first. |
| On Linux the library does not load (DllNotFoundException or "cannot open shared object file") | System packages the library needs are missing. | Run the command below. On Ubuntu 24.04 and later write libgtk-3-0t64 and libasound2t64. |
| The person connecting cannot reach the machine | The machine cannot reach the SkyyDesk servers. | Open TCP 21115–21117 and UDP 21116 to rs.skyydesk.com in the firewall. |
| On Linux, screen sharing approval is asked on every connection | The desktop runs on Wayland. | Approve it, or sign in to an X11 session. |
sudo apt install libgtk-3-0 libxcb-randr0 libxdo3 libxfixes3 libxcb-shape0 libxcb-xfixes0 \
  libasound2 libsystemd0 libva2 libva-drm2 libva-x11-2 libgstreamer-plugins-base1.0-0 \
  libpam0g gstreamer1.0-pipewire libpulse0
All functions
The .NET package is a thin layer over these C functions. The list of events is on the developer page.
| C | .NET | What it does | Returns |
|---|---|---|---|
skyydesk_init | new SkyyDeskHost(dir) | Starts the library. The first line of main. | 0; -1 without a folder |
skyydesk_set_event_callback | Incoming, Closed, Enrolled events | Sets the function events are sent to. | – |
skyydesk_start | Start(allowPassword) | Makes the machine reachable. With 0, every connection waits for approval. | 0; -2 without a callback (.NET throws) |
skyydesk_my_id | MyId | The machine's ID. | length; -1 if there is no room |
skyydesk_accept | Accept(id) | Lets a waiting connection in. | – |
skyydesk_close | Close(id) | Turns a connection away or ends it. | – |
skyydesk_password | OneTimePassword | The current one-time password. | length; -1 if there is no room |
skyydesk_new_password | NewOneTimePassword() | Generates a new one-time password. | – |
skyydesk_set_password | SetPassword(pw) | Sets a permanent password; an empty string removes it. | 0 or -1 (true/false in .NET) |
skyydesk_get_option | GetOption(key) | Reads a setting. | length |
skyydesk_set_option | SetOption, SetEnrollKey | Writes a setting. Server and account settings are refused. | 0; -1 if refused |